How To – Create custom VMware ESXi Image
If you are installing VMware ESXi on a server \ computer, sometimes you might run into a problem where ESXi cannot detect a Network Adapter (NIC) and therefore will not allow you to continue the installation. The reason for this is because the native ESXi installer does not contain the drivers for the NIC you have installed. This is the situation I found myself in recently when building an ESXi host in my home test lab.
To resolve this problem, we need to inject the drivers into the VMware ESXi installer image and therefore create a custom VMware ESXi image. Although this sounds hard, it is actually pretty easy. Below are the steps required to achieve this…
VMware ESXi Image Customizer
First step is to download the latest version of the VMware ESXi Image Customizer. At the time of writing this it is v2.7.2. You can download it from here >> VMware EXSi Image Customizer.
Once downloaded run the exe which will extract the application into a folder of your choice. In that folder you will find ESXi-Customizer.cmd which is executable for the application.
Downloading the required drivers
Next you need to find your NIC model and download the driver (in .tgz or .VIB format). My ESXi machine has a Gigabyte GA-Z77X-UP5-TH motherboard which has an onboard Intel Gigabit Ethernet NIC. For this I found that the E1000E drivers seems to work, so I managed to find a E1000E.tgz copy somewhere on the internet and I downloaded them to my local computer.
If you are using an Intel Gigabit NIC then you can try the same drivers I have, so you can downloaded them from here >> Intel Gigabit Ethernet NIC Drivers.
Creating a custom VMware ESXi Image
Now that we are ready, lets inject the drivers into the vanilla VMware ESXi Image and then create our own custom image. To do this, follow these steps:
- Navigate to the folder you extracted the VMware ESXi Image Customizer
- Run ESXi-Customizer.cmd
- From the window that appears, browse and select the vanilla VMware ESXi Image
- Next, browse and select the .tgz or .VIB file you want to inject into the image
- Finally, select a “working” folder which is where the final customized VMware ESXi Image will be found
- Click on Run to build your custom image
- The tool will inject your drivers and create a customised VMware ESXi Image ISO file. You can find this file in the specified working directory
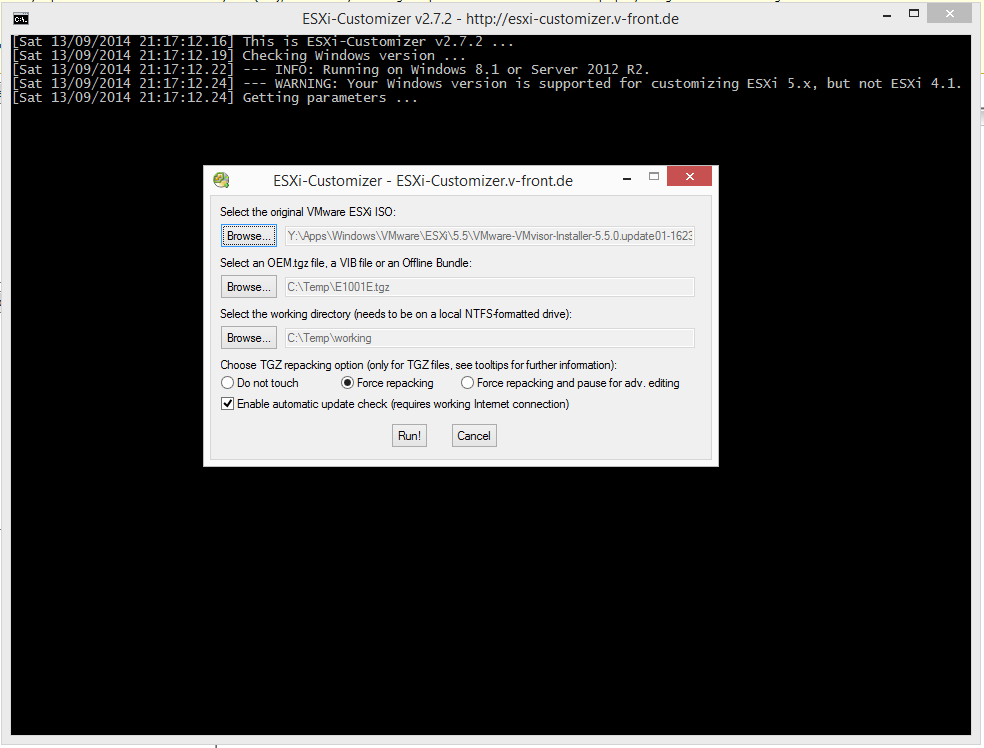
Here is a screenshot of my ESXi Image Customizer window prior to creating my custom image:
What if I can’t find my drivers?
If you can’t find a .tgz or .VIB driver file for your NIC, then do not worry you can easily create your own! To do this, just follow the ESXi Community Packaging Tools instructions.
Final Thoughts
Now that you have your ISO file you can burn it to CD \ DVD or you can create a bootable USB or alternatively if you are using a proper server you can use the Out-of-Band Management tool to virtually mount the ISO and build the server.
I went down the bootable USB path and used a tool called Rufus to do so. If you are interested, you can download Rufus from here.
That is it. If you can any questions, comments, ideas or suggestions then let me know below.
Thanks
Luca
Hi Luca,
How were you able to get the SATA drives to show up (if you had any?)I am building my esx lab out now and am running into issues where neither of my local sata drives are being recognized.
Thanks!
Hacked
Hi Hacked,
Interesting name haha 🙂 I didn’t have any SATA drives, but I would say that the reason why you are having this issue is because you might need to inject your SATA controller driver. What controller or motherboard are you using?
Also, have you tried ESXi 6 because they have included many more drivers in the native ESXi installer as compared to what was in ESXi 5.5.
Hope this helps
Luca
Haha thanks! It’s just a moniker for my online presence :). I have the same mobo you do (with the 88SE9172 Marvell controller) and I tried injecting the sata-xahci vib into my installer and tried installing it after the fact as well and none of my drives are showing up. I am trying with the latest release of esxi 6.0. The weird thing is if I try to list my drives via shell (I have three in there, one crucial ssd and two Seagate HDDs) only my ssd shows up but it’s not in vsphere.
Maybe this just means I need to go out and buy a synology haha. 🙂
Thank you for your time!
-Hacked
Have you tried to seeing if they are visible within ESXi \ vCenter? If you log into the web client and navigate to the host and then click on Manage >> Storage >> Storage Devices. This should show all of the disks visible, both local and remote (e.g. iSCSI, FC, etc).
If any disks are listed then you need to format them with VMFS to use them as a datastore. To do this, on the host navigate to Related Objects >> Datastores. From here you can click the plus button to create a new datastore. From the wizard you should see all of the unformatted disks presented to the host.
Hope this helps
Luca
Actually I figured it out. Should have checked it before but I guess the power cable I have always used for my drives wasn’t pushing enough power anymore oddly enough. After switching out cables the drives showed up without a problem. Thanks for taking the time to revisit an older post!
Ah wow interesting. Good to hear you got it working!